Adapted from DIY Natural

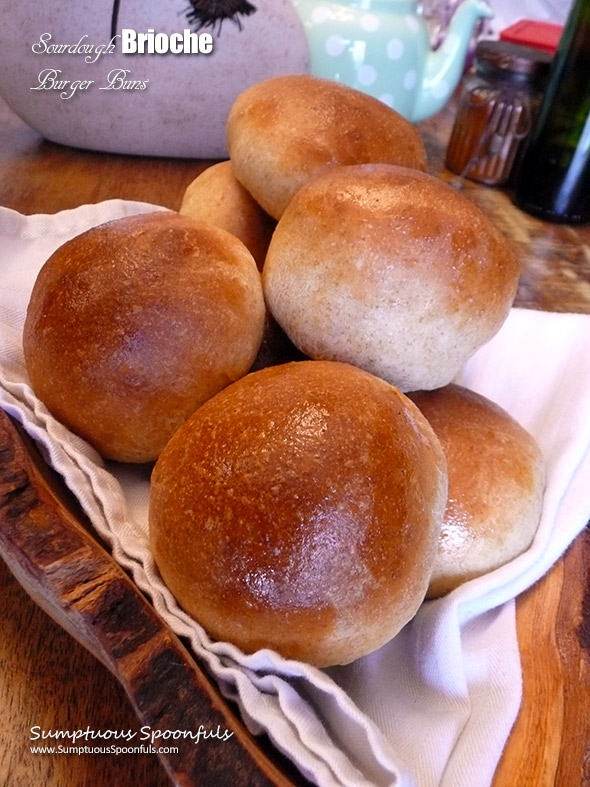
Soft, tender brioche buns, so wonderfully puffy and delicious–these buns are the perfect vessel to house your latest burger creation. May is National Burger Month, so I thought it would be the perfect time to share this scrumptious burger bun recipe with you … PLUS (and this is a huge bonus for all of us who have more sourdough starter than we know what to do with!), this recipe uses an entire cup of sourdough starter.
My kids both love these burger buns. My daughter wants her buns little as she is in love with all things tiny, but my son prefers the ginormous variety. Fortunately, I can easily adapt the bun size to please them both! They often eat the buns plain, straight off the pan just as soon as they cool down enough to touch, but my daughter also loves smearing peanut butter on hers, and of course, they are wonderful for burgers. I made my girl a smash burger the other day with one of the larger buns and she gobbled it up and asked for another! I couldn’t believe she ate two whole 1/4-lb. burgers in one sitting, but she was hungry (and probably making up for lost time after a stomach bug wiped out her appetite for 5 days).
I’ve made these buns several times since we started our sourdough journey and the kids still beg me to make them again! Janice (our sourdough starter) has been quite good to us and we feed her often, possibly more often than we really should. Since we started making sourdough bread and buns, it’s slashed our grocery bill too because my kids are eating more homemade bread, sandwiches, and tuna and less pre-packaged junk meals. We also make our own sourdough pizza crust, so ordering takeout pizza almost never happens anymore. I’m kinda really proud and so totally loving all the wonderful aromas in my home as our homemade bread and pizza bakes.
Why sourdough?
I think the #1 reason is: it tastes good. These buns don’t have much of a sour taste, but the sourdough adds a depth of flavor that is totally delicious.
And it’s good for you! Sourdough is full of probiotics (the good bacteria that helps your digestive system) and it’s easy on your tummy. People with sensitive stomachs and many people who are sensitive to gluten find they can eat sourdough without any issues. (Note: I am not a doctor … please consult with your doctor if you are celiac or gluten intolerant before trying sourdough with gluten.)
Your body also metabolizes sourdough differently. With most white bread, your body has a sudden sugar spike right after eating the bread and then a big energy crash, but sourdough doesn’t have that crazy see-saw effect on your blood sugar. Even white sourdough provides a more even, long-lasting source of energy. Sourdough bread has a low glycemic index and can help keep your blood sugar and insulin levels lower, which can prevent insulin resistance and diabetes. (Keep in mind, this effect can vary from person to person.)
Where to get sourdough starter?
If you want to start your own sourdough journey, you can beg some starter off a friend (most people are VERY willing to share, because starter surplus IS a thing that happens) … or you can make it yourself or purchase it. If you decide to go the homemade route, it IS quite simple, but if the recipe tells you to discard the starter, just don’t. There’s no need to throw away perfectly good starter, even in the beginning stages. Use it to make these buns! Or some crescent rolls or pizza dough … or even crackers. My friends Kathy and Aaron also make sourdough tortillas. There’s no limit to what you can do with “discard” sourdough starter!
What if I don’t want to do sourdough?
No worries! I have the perfect brioche bun recipe that requires no sourdough starter at all and can be made in the bread machine (or your stand mixer).
Do I need a stand mixer to make these buns?
A stand mixer certainly makes it easier, but you can totally make these buns without a stand mixer or bread machine. Just knead the bread by hand for about 10 minutes. It’s a great shoulder and arm workout! Sometimes I choose to knead my dough by hand just for the workout, and for the pleasure of feeling the dough in my hands. Sourdough bread has a softer, more giving feel than other doughs, and it’s very satisfying to knead it with your own hands. When you knead the dough with your hands, you’re getting up close and intimate with your food–something most of us in the modern world seldom do, and I think it’s an experience we’re really missing out on.
Can I use other flours?
If you want to substitute whole wheat, rye, flaxmeal, oatmeal or other whole grain flours for the bread flour, it will affect the rising. Your buns probably won’t rise as high and they will be more dense in texture. If you want to try this but you still want nice, light, puffy buns, I would suggest a mix of bread flour to no more than half whole grain flour.
Why yeast?
Even though the wild yeast in the sourdough will make the buns rise, I added some active dry yeast in this recipe as a kind of “insurance” to help the buns get nice and poofy and make the process go a little faster. I love watching how big they get as they rise! Some of the buns rise straight up (not up and out like most buns.) Do you have to add yeast? No, you don’t. You can skip (or greatly reduce) the active dry yeast in the recipe, but you’ll need to allow for longer rise times. Even a tiny pinch of yeast will make a big difference in rise times.
Print
Sourdough Brioche Burger Buns
- Prep Time: 15 minutes
- Cook Time: 20 minutes
- Total Time: 4 hours 35 minutes
- Yield: 12 - 24 buns 1x
Ingredients
- 2 Tablespoons butter, melted
- 1 cup filtered water
- 1 cup sourdough starter
- 2 eggs
- 2 Tablespoons honey
- 4 – 4 1/2 cups bread flour
- 1 teaspoon sea salt
- 1 teaspoon active dry yeast (optional)
For oiling the dough and buns: about 1 – 2 Tablespoons olive oil
Instructions
- Melt the butter and set aside.
- In the mixing bowl for your stand mixer, stir together the water, sourdough starter, eggs, honey, 3 1/2 cups bread flour, sea salt and yeast.
- Put the dough hook on your stand mixer, set the mixer to speed 2 and knead for about 7 minutes. While the dough is kneading, drizzle the butter in, a bit at a time and flour, a bit at a time (alternating between butter and flour until the butter is gone). Keep adding flour, just a bit at a time, until the dough stops picking up the flour. Keep kneading until the dough picks up all the flour in the bowl.
- Shape the dough into a ball, put a little bit of olive oil on your hands and coat the dough with oil. Set the dough back in the bowl, cover and let rise for at least an hour or up to 4 hours. (If using yeast, the dough might rise all the way to the top of the bowl!)
- Remove the dough from the pan and cut into 3 pieces. If baking right away, cut each piece of the dough into 4 – 8 pieces (depending on how big you want your buns). 4 pieces will yield large buns suitable for 1/4 lb. burgers, 8 pieces are more slider sized buns. Alternatively, you can wrap the dough loosely in plastic wrap and refrigerate at this point to be baked later.
- Shape each piece of dough into a spherical shape by using your fingers to stretch the top of the dough down and pinching it underneath. Keep doing this, rotating as you go, until the ball of dough is nice and round. Oil each ball with olive oil and set on a baking sheet, leaving plenty of space between balls. Cover with plastic wrap or a clean towel and let rise in a warm place for about 45 minutes (if using yeast) or 1 – 2 hours if not, until the buns are nearly doubled in size.
- Preheat the oven to 400 F. Bake at 400 F for about 15 – 20 minutes or until the buns are golden brown on top and firm when tapped.
- Remove from oven and brush lightly with olive oil. Let cool for at least 10 minutes before cutting.
Notes
The perfect warm rising spot for buns and bread is in your oven! Turn oven on to the lowest temp setting it will allow. When the oven is heated, turn it off and turn the oven light on.
Is it sourdough if you add yeast? I would contend that it IS sourdough because it contains sourdough starter, but if you’re concerned about adding yeast, then leave it out. Rise times will be longer without the yeast and your buns will taste more “sour”.
RECIPE SOURCE: http://www.sumptuousspoonfuls.com/
© Copyright 2019, Sumptuous Spoonfuls. All images & content are copyright protected. Please do not use my images without prior permission. If you want to publish any of my images, please ask first. If you want to republish this recipe as your own, please re-write the recipe in your own words or link back to this post for the recipe.
Stay tuned! I have an epic burger planned for Cinco de Mayo and National Burger Month … and it’s served on one of these beautiful buns. 🙂
70 comments
Best hotdog buns ever!! Very soft texture and not an over powering flavor. I am definitely saving this for future use, my husband even said it’s a keeper. Thank you for sharing the recipe!
★★★★★
You’re welcome, Kendra! Thank you so much for the kind comment.
I was wondering if you could post this recipe using weight since you mentioned you used a scale. This way didn’t work for me. Thank You.
★★★★
Hi Lori,
Thanks for your review and comment! I’m wondering: Did you use a stand mixer or some other method? Did you add more flour as the stand mixer was kneading the dough?
I don’t use an “exact” amount of flour because the amount needed can vary depending on humidity, elevation, the water content in your starter, etc. I start with 3 1/2 cups flour and add a bit at a time until the dough isn’t sticking to the bowl yet it still cleans the sides and forms into a ball. I use 75% hydration on my starter, but the consistency of it varies over time. Sometimes it’s thicker, sometimes it’s really thin and watery. I’m not sure I can translate that into weight measurements.
Let me know if that makes sense or if you need more help.
Thanks,
Ann
Perfect recipe for my family–light but not too airy. A good compromise between fluffy dinner rolls and something denser like ciabatta bread. Make every kind of sandwich taste better.
Hi Karen,
I’m so glad you and your family enjoyed the buns! Thanks for taking the time to leave a comment. 🙂
~ Ann
if you’re refrigerating the dough, do you shape them first and then put them in the fridge, or just put the dough ball straight in the fridge, or divide into just the three pieces and put those in the fridge?
I just divide into three pieces and wrap them loosely, then shape them when I take them out of the fridge. Thanks for asking, Kaila!
Thanks—I had the same question. I’ve made these once before and they are amazing! They are so tasty right out of the oven! It is kind of a long process so it’s good to know how to take a short break.
My dough is rising in the oven as we speak. So unlike regular brioche, do you not have to brush the tops of the buns with an egg wash in order to get that nice shiny, glazed look? Is that what the olive oil does when you brush them after baking instead? Have just never heard of that method before. Thanks!
The olive oil does the trick! Makes them nice and shiny and softens up the top, too.
Can the dough be frozen?
I haven’t tried freezing the dough, but I think you could. Normally I wrap loosely in plastic wrap and let it in the fridge for a few days and shape/use it as we need it.
If you want to try freezing the dough, this article might help: https://www.thespruceeats.com/how-to-freeze-yeast-bread-dough-427560.
Is the sourdough starter measurement for a stirred-down or puffy amount? Thanks!
Hi Maia, I typically scoop up the starter from my jar using a large spoon, but most of the time I use a scale so I don’t have to worry about a measuring cup. If you have a scale, try to get around 8 oz. of starter in the dough.
Amazing homemade hamburger buns. I made a half recipe (6 buns). I did slightly flatten them before baking, so they would be more bun-shaped. Great texture, easy to make while my sourdough loaves were undergoing bulk fermentation. If eggs were not in such short supply due to Covid pandemic, I would have made an egg wash and sprinkled with sesame seeds before baking, but the olive oil brushing after baking makes a nice sheen on the surface.
★★★★★
I’m so happy they turned out well for you, Liz. 🙂 I love the idea of adding sesame seeds to the top … I will have to try that next time I make these!
Thanks for taking time to comment,
Ann
Can you bake this dough into a loaf? If so what temp and how long?
★★★★
Hello Jocelyn,
I would suggest baking at 350 F. for about 45 minutes or until the loaf is nicely browned and sounds hollow when thumped.
Happy baking!
Ann
My dough is rising right now & the smell is out of this world. Thank you for this recipe! I will be adding sesame seeds on top & enjoying guacamole bacon cheeseburgers on these lovely buns tonight!
★★★★★
Guacamole Bacon Cheeseburgers … I have to admit I’m a little jealous and wishing I could join you. YUM!
These turned out wonderful. Soft and buttery, the perfect burger bun.
★★★★★
Thanks Melody! I’m so happy you had good results.
Currently letting these rise, but I’m curious… With the leftover refrigerated dough (there’s only three of us eating tonight), could the dough formed into a single brioche loaf rather than buns?
Great question, Sarah! I think it could, yes. One of my pinterest followers posted a picture of a loaf they’d made with the dough.
I ended up making a small braided loaf with about 1/3 of the amount of dough. SO good served hot with butter. Thanks for the recipe!
I just made a half recipe. Delicious! I forgot to brush with olive oil afterwards – I was in too big of a hurry to make my burger and taste them. With just the two of us, I have leftovers even with the half recipe, I am hoping these will freeze well.
[…] Sourdough Brioche Buns […]
Can I just use allpurpose flour I don’t have bread flour
Yes, you can use all purpose flour. Results might not be as good. If you have wheat gluten add a Tablespoon or two … it will help improve the elasticity of the dough. https://www.thekitchn.com/vital-wheat-gluten-what-is-it-84612
Hi there! If not using yeast, should we expect step 4 to take >4 hours? What % rise or spring should we be looking for to know it’s ready for the next step? Thanks!!
Hi Cassie,
How long it takes to rise without yeast really depends on several things: how active your sourdough starter is, how warm it is, and even moisture content in the air can affect it. When the buns are nearly doubled in size, they’re ready to bake.
Good luck with your buns!
Ann
So soft on the inside with a little crisp on the outside… just perfect! Added yeast so it only took about 4 hours from start to finish to create such puffy buns! I made the batch into 16 buns so it took about 14 minutes to bake (glad I remembered to check and didn’t leave them in for 20). Also added sesame seeds to the top to make these perfect for pulled pork for dinner. Will definitely make these again… Thank you!
★★★★★
You’re welcome! Thank you so much for taking the time to post a comment … you totally made my day. 🙂
I am going to make these for a “social distance” bbq for Saturday. I want to make the dough on Friday – my question, does the dough need to be brought to room temperature or can they be baked right away. Thank you
Hi Kelly, you can shape the dough into buns while it’s still cold, but you should let them rise before baking.
great thank you! Just finished making two batches … waiting for them to rise now!
These are fluffy and soft. So I made some cinnamon rolls with the dough. It was fantastic!
I made these last night. I’m out of butter so I made them using coconut oil and I still had great results. Thanks for the recipe!
That’s awesome, Adrienne! I’ve never tried making them with coconut oil … great substitution.
Think I could sub some or all of the water out for milk for even more softness? just envisioning a soft honey, butter, and milk bun and thinking that sounds divine. Looks great as is too of course 🙂
I think that’s a great idea, Nicky! Give it a try.
Hi Ann,
Does the recipe call for fed or unfed starter? If fed, how long do you recommend I use it after the feeding?
Hello Swati,
No, I did not feed my starter before using. I used it straight from the fridge!
Ann
Wow! I just saw this. I just made these with fed starter — and they came out great!
I always replace the water for milk and it works perfectly! This is my “go to” recipe for the bread I make for my family. Wonderful for sandwiches, hotdogs, or even just toasted with butter 😋 I have some raising as I type.
Hurrah! Thanks for letting me know, Kendra. You made my day. 🙂
I was wondering how long to bake if making a loaf?
I made hamburger buns with this recipe. It was wonderful.
I liked the dough and the outcome so much I use it all the time now. I’ve used it to make cinnamon rolls, runzas, and naan. I can’t stop experimenting with this dough because it’s always a success, it’s easy to make, it’s not too sticky, and it holds up well to a rolling pin.
Thanks for sharing this lovely recipe!
Stephanie,
Thank you so much for your sweet comment! I’m so glad you enjoy this recipe. I’m going to have to try using it for more than buns now too. 🙂
Ann
I just made these. They are lovely, soft, scrumptious, buttery and yummy! Great recipe!
Thanks for sharing your experience, Jill! I’m so glad you liked them.
[…] were really missing burgers and sandwiches because my brioche buns (both the bread machine and sourdough version) were the top recipes on my blog for many months, followed closely by my bread machine Hawaiian […]
Would it be possible to post your weight measurements (since you mentioned earlier you use 8oz of starter)? Thank you!
Hello Lorea,
Next time I make this I will make note of the weight measurements and add them to the recipe. Thanks for asking!
Ann
I made this recipe exactly as written (without the commercial yeast option) and it was soft and delicious! Just slightly tangy, and it was so soft. Best naturally yeasted buns yet!
However, my buns came out very pale, just like all of my other naturally yeasted soft buns do. What am I doing wrong? It is fully cooked (measures 200+degrees), so I know I am cooking it all the way.
★★★★★
Lorea,
I have had the same experience and questioned whether I was doing something wrong. I had a conversation with my dad (an expert bread maker) about it.
Our conclusions were: if the end result tastes great, you are not doing anything wrong! Doughs that are low in sugar just don’t brown as much, and I’ve found that to be especially true with sourdough. Let go of the expectations for “presentation” and enjoy the taste.
I am so grateful for your question and comment. Thank you. <3
Ann
These buns are amazing. The crumb is open, soft, chewy and slightly tangy. They look beautiful. The crust is golden brown, and the olive oil that’s brushed on when they come out of the oven gives them an appealing sheen. I preferred it to an egg wash and will use it on other yeast breads and buns. The dough is effortless to bring together and knead by hand. I use weight measures and started with 480 grams of bread flour but had to add more flour when kneading because the dough was too slack and sticky to handle. Even with the additional flour, my dough was slack and moist both before and after bulk fermentation. The dough balls flattened and spread during the second rise but puffed up beautifully in the oven. I divided the dough into 8 portions of 145 grams each for big buns. The only recipe tweak I made was to use a 1/2 cup of milk and 1/2 cup of filtered water for the liquid. My starter was unfed so I added the 1 tsp of active dry yeast. Great recipe!
I have made this many many times over and it is always so soft, and it’s so easy! Love this recipe! Thank you so much for sharing!!
Ps. I add in 100gm of melted butter for a richer taste.
★★★★★
Hi Kelene,
This makes me so happy … I’ll have to try them with the butter next time I make them. Thank you for your sweet comment!
Ann
I made it! My first brioche rolls! Thanks for making this recipe so accessible! My only regret is forgetting to add the salt. ah well…
I’m so excited they turned out well, Sarah! You’ll just have to make them again with the salt. 😉
Ann
[…] Soft & Fluffy Do-Ahead Dinner Rolls, Sweet Buttery Sourdough Crescent Rolls, Hawaiian Rolls, Sourdough Brioche Burger Buns … and the list goes on … if it involves bread, we’ve tried it and reveled in it. […]
I have a question, in step 2 the recipe says to combine and mix the ingredients, starter, eggs, honey, water, salt and bread flour in stand mixer bowl. Then in step 3 the recipe says to put the dough hook on and add butter & bread flour alternating until butter is gone. Could you please clear this up for me, I have never made bread of any kind and was going to test the waters with your recipe but it would seem to me that if I mix the bread flour in step 2 as the recipe says, then I would have no flour left for step 3. Am I reading this wrong or is it a typo and I should mix all ingredients except the flour & butter in step 2 and then go to step 3 and add in flour and butter alternating? Please forgive my ignorance.
Thomas,
Thank you for asking! The recipe calls for 4 – 4 1/2 cups bread flour. In step 2, you add 3 1/2 cups of the bread flour. In step 3, you add the butter with a bit more of the extra cup of bread flour, alternating with the butter, until the butter is incorporated and the dough cleans the bowl without sticking to it. You might use 1/2 cup, you might use 1 cup more flour, depending on humidity and altitude and how wet your starter is. If the dough gets too sticky while you are kneading the dough, simply add a bit more flour. By a bit I mean just a Tablespoon or two. I just tap my measuring cup to release a little bread flour into the bowl. Please don’t hesitate to reach out and ask more questions if that’s not clear! I’m so excited you are making bread for the first time using my recipe … I hope it works out well for you. If not, please don’t give up. Homemade bread is so wonderful once you’ve mastered it.
Happy baking!
Ann
Made these buns and they were very yummy! Only reason I gave 4 stars and not 5 is that I feel like the result would be better if the measurements were more accurate. Any chance you could share this recipe in grams/mls instead of cups/tablespoons? Thank you!
★★★★
Thanks for the kind review, Elaine. I’m so glad the buns turned out well for you.
Perhaps one of these days I will find time to convert the recipe to metric units. Since this blog is a labor of love that I do not get paid for, it’s all done on my free time.
Take care and happy baking!
Ann
I have made these several times, some with added yeast and some without. Admittedly the batches without added yeast took longer to rise, but they were just as good. Just make sure you use filtered water for the best results. Thanks for the great recipe.
★★★★★
Thanks for your comment, Lou! I’m glad you had good results without the added yeast as well.
The perfect roll! Absolutely loved the consistency. This is the first roll that I’ve made in awhile that worked out so well (and I try various recipes often).
★★★★★