Ingredients
Scale
- Several pieces of chicken (I did 4 legs and 3 chicken breasts)
- 1 quart of buttermilk
- Several horizontal slices of fresh pineapple, skin removed
- 2 – 3 Tablespoons maple syrup (to brush the pineapple with)
- Cooking spray
For the honey pineapple teriyaki sauce:
- 1 cup pineapple orange juice
- 2 Tablespoons EACH: ketchup, honey and soy sauce
- 1/2 teaspoon ginger
- A pinch of powdered hot pepper (or more, to taste)
- 1/4 teaspoon creole seasoning
- 2 – 4 cloves of garlic, peeled & chopped
- To thicken: 1 Tablespoon cornstarch + 1/4 cup water
Instructions
- An hour or more or perhaps the night before, set the chicken in a bowl and pour the buttermilk over to cover it completely (you might not need all the buttermilk, depending on how much chicken you have). Cover the bowl and refrigerate at least an hour, preferably longer (but not more than 24 hours).
- When you’re getting close to grilling time, prep the pineapple, making a nice slice for each serving, then set aside.
- In a small saucepan, whisk together the ingredients for the sauce EXCEPT the cornstarch mixture. Once all the ingredients are well mixed, heat the saucepan over medium to medium high heat. Meanwhile, whisk the cornstarch with the water in a small bowl.
- Once the sauce in the saucepan is bubbly and hot, while whisking, add a small bit of the cornstarch mixture and whisk and cook for a minute or two. Repeat, adding just a little cornstarch mixture at a time, then whisking for a minute or two until the mixture is thickened to your liking. (For me, this took only a few minutes and about half the cornstarch mixture.) Pour about half the mixture into a small bowl for dousing the grilled chicken with and grab a brush for brushing the sauce on the chicken. Set the rest of the sauce aside for serving time.
- Then start up the grill and when the grill is nice and hot, take the chicken out of the buttermilk mixture and rinse it lightly, then set the chicken on the hot grill. Paint the chicken on the top with the sauce, cover and let cook for about 5 minutes or until the chicken is nicely seared on the bottom.
- Turn the chicken and paint the other side with sauce, then cover and let this side cook until seared and brown. Repeat if there are more sides yet to sear. Once all sides are seared, move the chicken to a cooler section of the grill to finish cooking, painting it once again with the sauce. Let the chicken cook on the cooler side of the grill for 10 – 25 minutes (depending on how hot your grill is).
- Spray the grill with cooking spray, then with a separate brush, paint the pineapple slices with maple syrup and set the pineapple slices on the heat. Now is also a good time to cook up sides like veggies or dessert. Turn the pineapple and the chicken once or twice, painting the chicken with more sauce as you go. The pineapple should get a little brown, but not TOO dark on each side.
- When the chicken is done (you can test it by piercing the middle of a large piece with a knife. If the juices run clear, it’s done), remove it from the grill along with the pineapple.
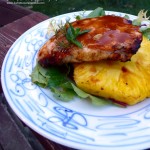
- Serve a slice of pineapple with some chicken over rice or a bed of greens with fresh basil or mint for garnish, if you have it. Drizzle some of the sauce on the chicken just before serving, or serve the extra sauce on the side.
Notes
You need at least an hour to marinade the chicken in buttermilk. This will keep it nice and moist on the grill.
RECIPE SOURCE: http://www.sumptuousspoonfuls.com/
© Copyright 2013, Sumptuous Spoonfuls. All images & content are copyright protected. Please do not use my images without prior permission. If you want to publish any of my images, please ask first. If you want to republish this recipe as your own, please re-write the recipe in your own words or link back to this post for the recipe.