Adapted from King Arthur Flour
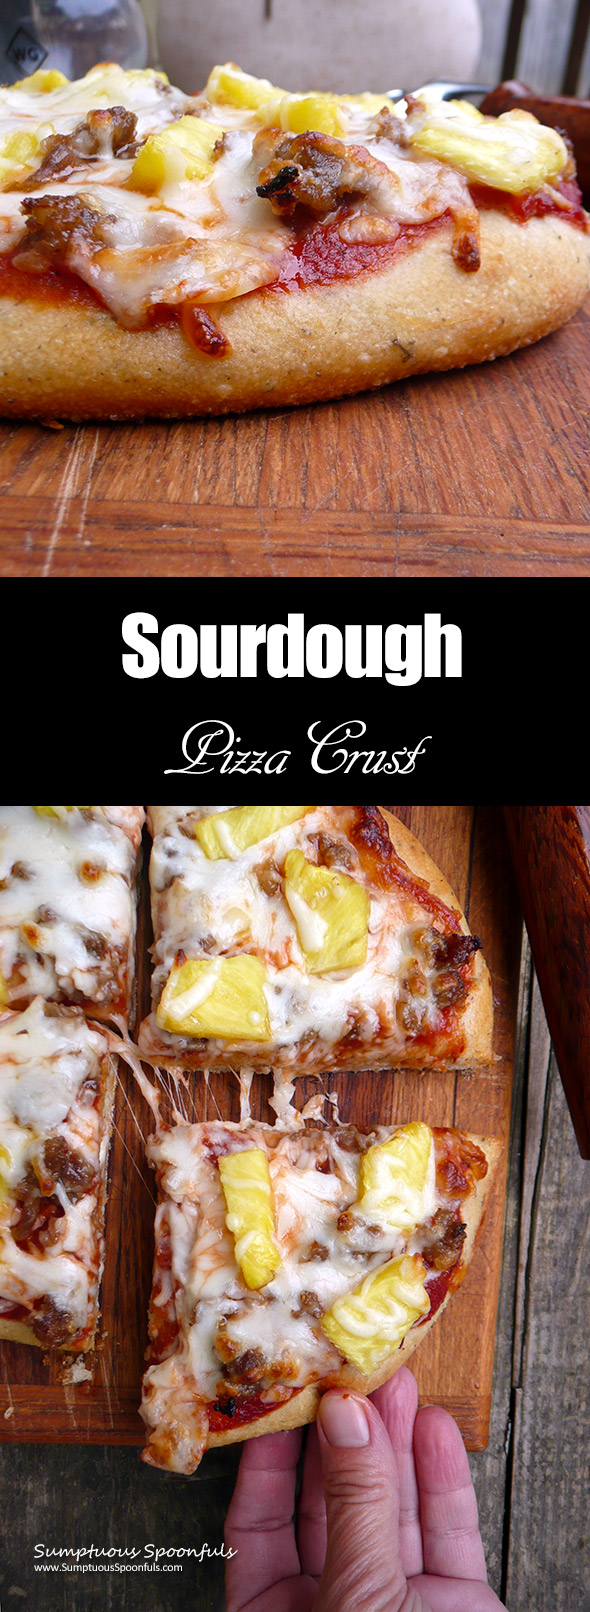
Crunchy on the bottom and soft and chewy in the middle, seasoned with Italian Seasoning and garlic, this pizza crust has quickly become our go-to pizza recipe. It’s a versatile sourdough pizza crust that can be as thick or thin as you like it … and it uses an entire cup of starter! We started out making this crust in an attempt to use up excess starter and my kids love it both topped with pizza toppings and baked plain, as flatbread. So yeah, I have been making this recipe a LOT.
I used this crust to make my spinach mushroom stuffed pizza pie and for that pizza, I rolled out the dough super thin. It was amazing, nice and crunchy on the bottom, just like I like it, but still soft and chewy on the inside, even though it was very thin. My son likes his crust more like a hand-tossed crust (if you think about Domino’s hand-tossed pizza) and my daughter likes hers a little thicker, almost deep dish style and this one pizza crust recipe does it all: thin, thick, or somewhere in between.
What’s the secret to making the crust style to my own liking?
There are two factors at play:
- How thin you roll out the dough.
- How long you let it rise.
For super thin crust, roll it out really thin (to get it super thin, use your hands to gently stretch the dough a little further) and bake immediately. The really nice thing about a sourdough crust is that it has more “give” than a regular yeasted crust and won’t spring back as quickly, so it’s easy to get the dough really thin.
For medium, hand tossed style, roll it out about 1/4 inch thick and let rise just slightly.
For thicker crust, roll it out 1/4 inch thick and let rise longer.
For super deep dish crust, roll it out to 3/8 inch thick and let rise even longer. Keep in mind that the crust will rise while baking too, so you don’t want it to rise to the full thickness you want in the end. You’d be surprised how much it poofs up in the oven!
How long does it take to rise?
It depends on how warm your rising spot is and how thick you want the crust. The first rise should take about 2 hours, but you can get that to go faster by heating the oven to the lowest setting, then turn it off. Turn the oven light on. I’ve cut the first rise down to roughly an hour with this method. The second rise can be anywhere from 0 (for thin crust) to 30 minutes for hand tossed to an hour (or more) for thicker crust. The longer you wait, the bigger it will get. Honestly, nobody in my family seems to want to wait for deep dish style … but hey, if deep dish is what you’re after, go for it. Just be patient with the dough and give it time. Also, oiling the top of the dough with olive oil after you’ve rolled it out will help it rise.
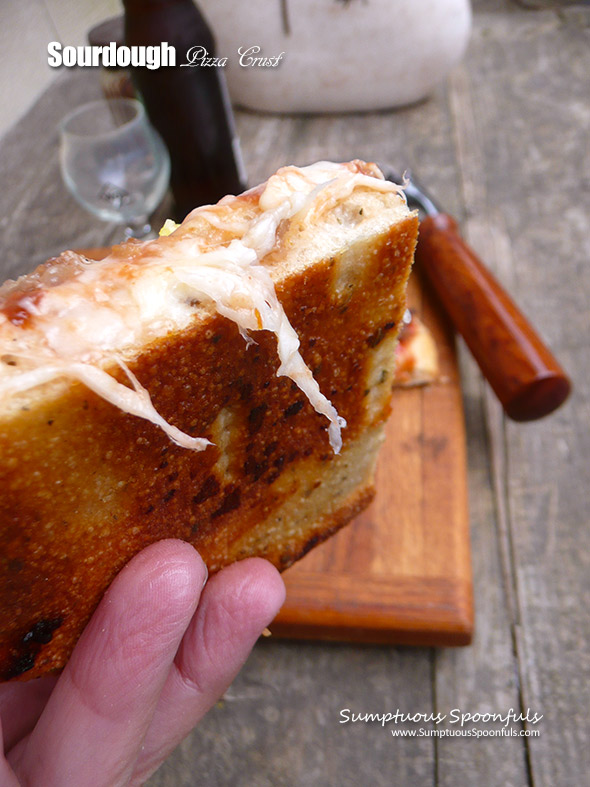
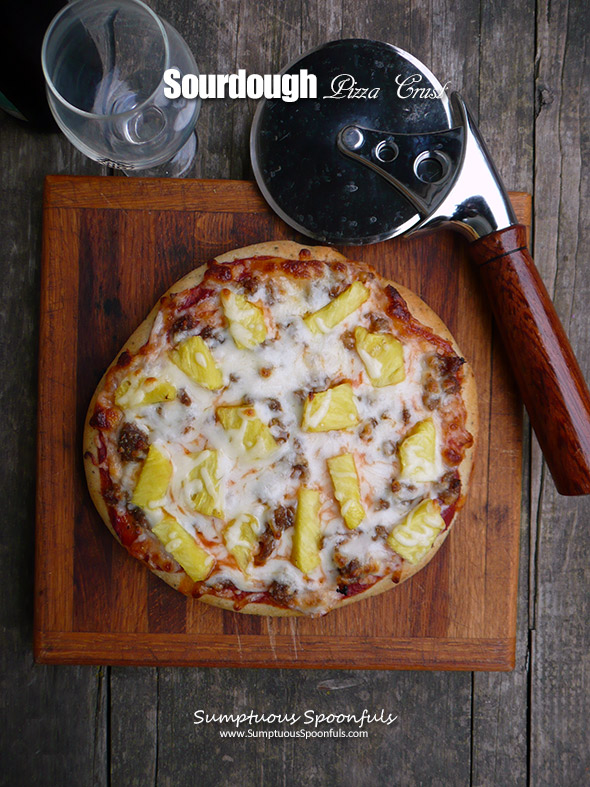
The photos, by the way, are from one of my daughter’s recent pizzas. (The beer in the background is mine, though.) This crust is a little thicker than hand-tossed … just look at that beautiful crunchy bottom crust! Her favorite pizza toppings are sausage and pineapple. I may have recently purchased a fresh pineapple just to top her pizzas … I’m such a sucker for my kids.
How do you get that nice crunchy bottom?
Use a cast iron pan and oil it well with avocado oil (or other oil with high smoke point). I recommend avocado oil because the smoke point is 500 F, so it won’t burn in the hot oven. Heat the pan in the hot oven for 10 minutes before adding the crust to the pan. You’ll hear the crust sizzle a little when you set the dough in it. Music to my ears!
Can you use this crust for grilled pizza?
Yes! I tried it last night, making another pizza for my girl, but on the grill … and it turned out beautifully. When you heat up your grill, make sure you have a “hot” area and a cooler area. I oiled the top of the crust with olive oil, then put the oiled side down directly on the hot side of the grill for about 5 minutes (gotta watch the crust carefully on the hot side and take it off as soon as the bottom of the crust is browned!), took it off and flipped the crust over, added the toppings on the cooked side of the pizza crust, then returned the pizza to the cool side of the grill to melt the cheese. I got impatient and finished it off in our toaster oven to get those nice browned cheese spots, but you can just keep cooking it on the grill directly until the cheese is melted.
Print
Sourdough Pizza Crust
- Prep Time: 15 minutes
- Cook Time: 20 minutes
- Total Time: 3 hours 35 minutes
- Yield: 2 - 4 pizzas 1x
Ingredients
- 1/2 cup water
- 1 cup sourdough starter, unfed/discard
- 1/2 – 2/3 teaspoon active dry yeast (can be omitted)
- 2 1/4 – 2 1/2 cups bread flour
- 1 teaspoon sea salt (non-iodized)
- 2 teaspoons Italian Seasoning
- 1/2 teaspoon granulated garlic
- About 2 teaspoons of extra virgin olive oil
Instructions
- Add the water to the mixing bowl for a stand mixer. If your sourdough starter has any liquid on the top, stir it back into the starter and measure out 1 cup and add it to the bowl. Add 2 cups of the flour, the salt, seasonings and garlic.
- Stir to mix. The dough will be VERY shaggy. Put the dough hook on your mixer and set it on speed 2. Knead for about 7 minutes, adding a bit of flour at a time after the dough comes together and starts to stick to the bowl. When done, the dough should clean the side of the bowl and cling to the dough hook.
- Shape the dough into a ball, then use your hands to coat the ball with oil. Set it back in the mixing bowl, cover and let rise until doubled, about 2 hours.
- Cut the dough into 2 – 4 pieces (depending on how big you want your pizzas – we typically split it into 3) and shape each ball into a disc. Wrap any dough you’ll bake later with plastic wrap and store in the fridge.
- If making a thin crust pizza, preheat the oven to 450 F. and set a cast iron pan oiled with avocado oil in the oven to preheat.
- For any dough you want to bake today, roll it out or use your hands to stretch the dough to the desired thickness. For thin crust: super thin (as thin as you can make it). For hand-tossed or thicker: about 1/4 inch thick. For thick crust: 3/8 inch thick.
- For thicker crusts: oil the top of the dough with olive oil and let rise on a floured surface until the crust is nearing the right thickness (keeping in mind it will puff up as it cooks), anywhere from 15 minutes to an hour.
- When it’s near time to bake, preheat the oven to 450 F. and set the oiled cast iron pan in the oven. Let the cast iron pan heat for 10 – 15 minutes longer in the oven to get nice and hot.
- When ready to bake, using oven mitts to protect your hands, take the cast iron pan out of the oven. prick all over with a fork, then set the dough in the hot pan and return quickly to the oven to bake for 5 – 7 minutes or until cooked but not browned yet.
- Take the pan out of the oven, use a spatula to move the hot crust to a flat surface, then return the pan to the oven to keep it hot. Top the pizza as desired, then once again, set in the hot cast iron pan to finish cooking.
- Cook until the cheese is fully melted and a little browned in spots. Use a spatula to move the crust to a cutting board to cut. Let cool very slightly and enjoy!
Notes
Time varies based on how long you let your crust rise. Dough can be refrigerated for up to 3 days before baking.
Is it sourdough if you add yeast? I would contend that it IS sourdough because it contains sourdough starter, but if you’re concerned about adding yeast, then leave it out. Rise times will be longer without the yeast and your pizza crust will taste more “sour”.
© Copyright 2020, Sumptuous Spoonfuls. All images & content are copyright protected. I love it when you share, but please do not use my images on your own site/page without prior permission. If you want to publish any of my images, please ask first. Sharing, pinning, and tweeting is always appreciated as long as the shares and pins link back to here for the recipe. If you want to republish this recipe as your own, please re-write the recipe in your own words or link back to this post for the recipe.
3 comments
[…] good starter, even in the beginning stages. Use it to make these buns! Or some crescent rolls or pizza dough … or even crackers. My friends Kathy and Aaron also make sourdough tortillas. There’s […]
[…] Sourdough Pizza Crust – super flexible recipe that adapts to your preferences. Many whose bodies don’t like gluten CAN tolerate sourdough. (NOT for celiacs, though.) […]
Looks amazing, Ann! I’m planning on trying it out. Thank you for the detailed recipe